Arduino Nano互換品でmicroSDカードを使う
データロガーの要素である記録装置。
Arduino Nano互換品でmicroSDカードを使う方法を備忘録としてメモ。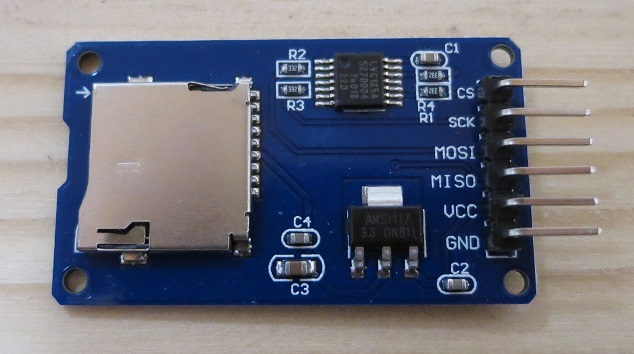
【準備したもの】
・Arduino Nano互換品
・Micro SD TFカードメモリシールドモジュール
※このモジュールに実装されたams1117とlvc125aがsdカードに適切な電圧に変換してくれていると思います、多分。
・Micro SDカード SDHC32GB(FAT32でフォーマット 容量はこんなに大きくなくてもよいかも。。)
【配線】
SD TFカードメモリシールドモジュールへは以下の配線を繋ぎます。
CS → D4
SCK → D13
MOSI → D11
MISO → D12
VCC → 5V
GND → GND
【スケッチ】
標準で入っているライブラリ「SD.h」を使用します。
1秒ごとに「Hello, World!」を記録し、ついでにカウンタも付けてみました。
セミコロン「;」を間に入れたのは、エクセルで扱いやすくするための練習です。
詳しくは「区切り文字 エクセル」で検索して下さい。
---------------------------------------------------------------------------—-
#include <SD.h>
const int chipSelect = 4;
String dataString = "Hello, World!";
int x = 0;
void setup() {
// Open serial communications and wait for port to open:
Serial.begin(9600);
while (!Serial) {
; // wait for serial port to connect. Needed for native USB port only
}
Serial.print("Initializing SD card…");
// see if the card is present and can be initialized:
if (!SD.begin(chipSelect)) {
Serial.println("Card failed, or not present");
// don’t do anything more:
while (1);
}
Serial.println("card initialized.");
}
void loop() {
// open the file. note that only one file can be open at a time,
// so you have to close this one before opening another.
File dataFile = SD.open("test.txt", FILE_WRITE);
// if the file is available, write to it:
if (dataFile) {
dataFile.print(x);
dataFile.print(";");
dataFile.println(dataString);
dataFile.close();
x = x + 1;
delay(1000);
}
// if the file isn’t open, pop up an error:
else {
Serial.println("error opening datalog.txt");
}
}
---------------------------------------------------------------------------—-
このスケッチでSDカード内に「TEST.TXT」ファイルができ、下記のような情報が記録されます。
0;Hello, World!
1;Hello, World!
2;Hello, World!
3;Hello, World!
スポンサードリンク